Showing posts with label fabric printing. Show all posts

20 June 2024

Soon-to-be FQs

Back in March, I was elated when the first day of spring landed on the beginning of a new row on my 2024 seasonal digital temperature quilt. Yesterday, I finished spring and finished another row! This was not planned! I am so excited the seasons changed at just the right time!

I also finished two of my half-year fat quarter digital temperature quilts. I can't print them at Spoonflower just yet, but I cannot wait to meet my latest creations!

I'm still not crazy about the hot colors in the digital rainbow temperature quilt, but I love the solar eclipse and northern lights representations. I decided to keep going with a new digital rainbow temperature quilt for summer and fall for yet another fat quarter because I think it will be fun to design a project using both fat quarters.

Of course, the pièce de résistance is my 2024 digital snowflake temperature quilt, done in the same color scheme as my 2023 crochet temperature project. I won't start a new fat quarter using this color scheme, but I will finish the full year digital snowflake temperature quilt. And I just may have to make a dress or coat from this when done!

18 February 2021

Under My Head

(affiliate links to my fabric designs)

Someone left a sweet little snowflake pillow on my porch right before Christmas. I used the snowflake designs on that tiny little pillow as crochet inspiration, and I shared the patterns each week via my Snowflake Mondays. I thought it would be fun to celebrate our sixth annual Make a Snowflake Day by recreating the little pillow with my crocheted snowflake interpretations on a Spoonflower fabric panel. I ordered the fabric on January 11. It didn't arrive in time for our Snowflake Ball on February 6, but it still became a fabulous pillow!

Here are my crocheted snowflake interpretations from the little pillow.

I photographed the white flakes on a piece of blue batik, then worked a little Photoshop magic to create the Spoonflower fabric panel. I had four repeats printed on yard of fleece. I chose fleece because I thought that would make the pillow really soft. Oh, was I right! I had ordered Spoonflower fleece once before, but I think they've upgraded because this batch is every bit as wonderful as the fleece I might buy in a fabric store.

I picked one of my Colorado 14er designs for the pillow backing, hoping the colors might go okay with the pillow front. Oh, am I ever pleased with the actual fabric!

I looked up down stuffing, and the price was so far out of my range, I decided I could use up some otherwise unusable quilt scraps inside the pillow. I decided to use up some of my batting remnants to line the pillow to pad the leftovers and make the pillow not quite so stiff. However, I didn't have enough large batting leftovers to make two linings. I have four big pieces, but I didn't want to cut into them because they are the perfect size for baby quilts. Oh, and I just learned I need to have another baby quilt finished by the end of March...

Last year when quilt batting was nowhere to be found, I bought an entire bolt of my favorite brand because I found one. I didn't even really scrutinize the price. I thought the bolt might be enough to finish all my WIPs, so I justified the expense. I truly did expect to finish seven or eight more quilts than I actually did last year! Yesterday I looked up how much a full bolt of batting would cost now, and it's $90 more than what I paid, so I consider this expense even more of a bargain now. I actually consider myself very lucky!!!

I had not cut into the stash yet. I measured and cut off a strip big enough to make three pillow linings. I didn't know if my cheap little sewing machine could handle two layers of fleece and six layers of batting, but I was about to find out.

The machine seaming wasn't the easiest I've ever completed, but it wasn't the most difficult, either. The thread broke only twice. It took longer to stuff the pillow than it did to sew all the way around it, except for the eight inch opening for stuffing.

I dug out all my quilt clippings from the past six or so years. I separated out some of the batting scraps because I can use that to stuff amigurumi.

And this is what I had left for pillow stuffing! Each of the sandwich-sized bags contains the clippings from two or three quilts! The big freezer bags have leftovers from T-shirt quilts and handcloth baby bibs.

I thought I might have enough clippings to finish a second pillow, too. But alas, all that's leftover now that the pillow is stuffed are the big bags. Just like that, all the little bags are gone! I really cleared out a bunch of storage space!!!

After stuffing, the pillow opening was hand-stiched closed with an upholstery needle in about 25 minutes. Now I lean on my newest pillow while I watch a movie, or I can lift it as a great arm workout. I can't believe how heavy it is! I guess I should weigh it to give that statement some proof...

Okay, so the pillow officially weighs 7 pounds. Not as heavy as it felt, but it is still a heavy pillow!

Linking up with Alycia Quilts and Confessions of a Fabric Addict.

04 November 2014

Snowflake Crazy

(affiliate links to my fabric designs)

I needed pink snowflake fabric, so I designed some myself.


While working on my last quilt, I wished I had more pink fabric with snowflakes that was different from anything else. So I designed my own!

Didn't stop with just pink, either. I've collected blue snowflake fabric for more than 20 years. For a long time, I've wished I could get some of the fabrics in my collection in gradient shades.

So I designed my own!

My newest Spoonflower stash!!!

Because Christmas is drawing near, I thought perhaps it might be wise to make some red, green and blue, too. Now I just have to come up with projects for all this luscious snowflake fabric!

The day these fabrics came in the mail, I was at work. I couldn't wait until the end of the day to start cutting! Then I had to decide which one to use first.

The Pink Wave Snowflake fabric I designed last spring jumped out at me while I was stewing over patterns and projects, and I decided to incorporate both pink fabrics into a new pin quilt. It would be just perfect for my collection of pink ribbon pins!

a new pin quilt

Cut out the pieces and stitched them together the first night. Layered, basted and quilted the second night. Afterthought pillowcase bound the quilt the third night.

Another big confidence booster! Finished in three nights! The only true free-motion quilting is the snowflake in the center, but the more I practice, the better I get at it. Eventually, I may work up the guts to free-motion quilt Welcome to the Jungle!

think pink

tickled pink

snowflake detail

all the pink

believe

Linking up with Confessions of a Fabric Addict and Crazy Mom Quilts.

02 October 2014

Unexpected

Maroon Bells

Look out, Maroon Bells, here we come!

That was the plan, anyway...

Our final charity ride each year is in Durango, and we must pass through about 200 miles of extraordinary aspen stands to get there. Typically, this annual pilgrimage is our first photographic autumn color tour of the year. This year, the leaves began turning early, so our five-day getaway was our second leaf extravaganza of 2014.

Monarch Pass
Monarch Pass, Week 1
free wallpaper available here

Because we had five days, we planned to get up at 4 a.m. on Day One and drive to Maroon Lake outside of Aspen for a 7 a.m.-ish sunrise. This typically is a stop on our annual autumn leaf tour every year, nearly 16 years straight for me now.

One year more than a decade ago resulted in this awesome poster.

One of the final daisies of the season framed by Pyramid Peak and the Maroon Bells; montage created in Photoshop and duplicated in a very wild quilt!

This poster was so popular in the mountain-climbing club I then belonged to, I thought it should be a quilt, too. So I printed eight of the manipulated photos on fabric; eight because that's what I could fit on two sheets of 8x10 fabric. Because this was a wild concept, I thought zebra stripe borders were in order. The blocks turned out incredible, in my opinion, but I needed one more.

To harmonize with this crazy theme, I thought a hand-appliqued dahlia block would be the perfect center for my Crazy Bells blocks. All the zebra stripe fabric and dahlia fabric were leftovers from clothes I'd made for my kids when they were really small and still crazy enough to wear clothes mom made.

Zebra Dahlia

The dahlia block was a bit bigger than my Colorful Bells blocks, so I chopped it down to match, then assembled the quilt top. It then hung on my quilt rack for about 12 years!!!

Colorful Bells

Last June, I realized I was going to be the only member of the Send group in Ravelry's Spring 2014 UFO Club without a finish. The group offers a fun quarterly challenge to get at least one unfinished quilt (WIP or Work In Progress) done. The Send group sends fat quarters to finishers at the end of each quarter. There also is a No Send group; they get no fabric rewards for finishing... by choice! Perhaps one day I will be able to temper my fabric addiction, but for now, Send group for me!!! I LOVE the rewards, especially because they come from all over. I even received a fat quarter from Canada for my previous finish!

Fat quarters from other Send group members sounded delicious, but my main goal was to NOT be the only one in the group without a finish. So I rummaged through my leftovers to find something for a backing and came upon almost enough of the plum zebra fabric for the entire back. I added a strip of white zebra to make it big enough to cover the back, then pieced together batting leftover from past quilts to make the center layer big enough.

I then did something I've never done before. I pin-basted the layers because I thought that would enable me to finish by the end of June. Just getting the layers on my quilt frame would have taken longer than the one night I had before this year's MS-150 bike ride.

I thought I could whip this WIP into shape after pedaling 150 miles the following two days. I underestimated the drain of 150 miles on a 50-plus-year-old body. I was too tired after the ride to finish. Then life got busy. No time for sewing. The UFO (UnFinished Object) hung for another 12 weeks or so.

Finally, the night before our Durango trip, I decided I didn't want to be the only one in the Summer 2014 UFO Club Send group to NOT finish a quilt. I would be gone through the end of the month, so it was now or never. Or at least not in the summer challenge, and a second consecutive quarter of being the only quilter not to finish a project. NO WAY!

quilting detail

I got off work late that night, packed for the trip, then sat down to start machine quilting this baby. Once again, I chickened out of true free-motion quilting and did the lift-and-rotate method to work an outline around the dahlia star all the way to the edges, except for the Maroon Bells photos. Lift the presser foot; rotate the quilt, two, three, four; lift the presser foot, rotate the quilt... This quilt was small enough (43 inches by 40 inches) that lift-and-rotate wasn't as much of a pain in the back as Lizard Leftovers.

Most importantly, finishing another quilt would give me just enough confidence to take on the next UFO. One of my problems, in addition to being over-committed all the time, is that the time between finishes diminishes my faith in my machine quilting. I've read somewhere you have to log about 1,000 hours of machine quilting to be truly good at it. I go into every project with an attitude of "This will be perfect or else!" Or else it doesn't get finished.

I NEEDED a finish. I needed to know it's okay if a practice quilt is not perfect, as long as I'm building skill and confidence. And finishing!

This quilt top was just what the quilt police ordered. It's not perfect. I've decided I HATE pin-basting. The quilting alone took until nearly 1 a.m., which made both of us too tired to get up three hours later to drive to Maroon Bells. And I still had to finish the binding.

Colorful Bells

The next morning, we slept in. Because really, we had no choice, with an eight-hour drive ahead of us! And then while The Lizard loaded up the car, I put on a binding made of leftover black fabric from Dancing Lizards, my first entirely-by-machine binding, and by golly, what a start to a great vacation! I FINISHED A QUILT! A very old quilt, to boot!

Colorful Bells

It cost me the Maroon Bell sunrise I was hoping for, but perhaps this fabric Maroon Bells finish is even better than a few more photos in a vast collection. I was so happy as we finally began to head west at about noon, I'm not sure our tires touched the ground until Kenosha Pass, where the leaves were at peak! We would have missed the leaves at Kenosha Pass had we taken the Aspen route to Durango instead. Kenosha Pass leaves were mostly gone when we drove through again five days later!

Kenosha Pass
Kenosha Pass, Week 2

Linking up with Crazy Mom Quilts here and Confessions of a Fabric Addict here.

02 May 2014

Spooned

(affiliate links to my fabric designs)

My Home-Printed Snowflake Fabric


I miss printing my own fabric. A LOT. We were forced to buy a new computer a couple of years ago, and my fancy, schmancy Canon photo printer doesn't work with the new computer. I'm beginning to mellow a bit, but for all these months, I've been rebelling against the computer industry for forcing continual upgrades and new purchases.

Eventually, we will invest in a new photo printer. While my steam continues to fizzle, I decided perhaps it's time to try Spoonflower. Several friends and even some non-sewing family members have been suggesting and urging I develop my own line of fabric.

The test print is in!!!

Oh, am I in love!!!

my first test print

Of course, this makes me miss printing my own fabric even more. I must confess, though, it will be fun to use this and my next test print up while I try to save up for a new printer.

My first test print is but a fat quarter. I had to make sure my latest idea looked good on fabric before moving forward. I already knew it looked good on paper...

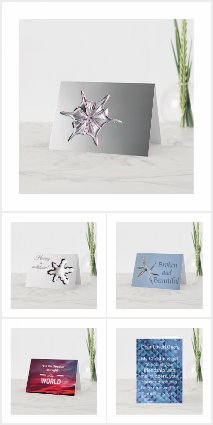
greeting cards

That didn't stop me from experimenting with matching wrapping paper!!!

Nice work!

It's a wrap!

My Snowflakes on Stage

Better Than the Rest

I've been placing all my pins on a little wall quilt for about 12 years now. When The Lizard came along, he began collecting pins, too. At first, we could put our pins together. Didn't take long, though, for him to need his own pin space. So I made a pin quilt for him.

The Lizard's pin quilt is beginning to fill up.

In the last couple of years, my pin quilt began showing signs of too many pins. I don't have enough room anymore to move pins around and make room for new pins, unless I start pinning right on the photo! (Which I actually considered when I learned our printer would not work with the new computer.)

Time to make another pin quilt; this one is full!

No More Room

I thought my first test print with Spoonflower might be the perfect center for a new pin quilt. I can keep all my cycling, mountain and event pins on the old pin quilt, and my new snowflake pin quilt could house all my crafty pins, such as Ravellenics and Denver National Quilt Festival. It might also make a good home for the breast cancer awareness pins and the blood donor pins.

Detail

A New Home

The Collection

It's going to take me a little while to figure out which pins I want where. I don't mind the puzzle, though. It will be fun to relive the memories of the pins as I slowly repin. And I'll be getting a new Denver National Quilt Festival pin tomorrow!

As much as I love my Spoonflower fabric, I'm hoping to have my own printer by the time I need another pin quilt. There's just so much more satisfaction in knowing I made the fabric myself.

In the meantime, man, is it ever cool to get one of my photos or photo creations on a piece of fabric bigger than 8.5x11!!!

Linking up with Crazy Mom Quilts here, Confessions of a Fabric Addict here and Quokka Quilts here.

wearable fabric prints

quilt back

Winter 14ers

Sunshine Peak

Done!

Half of my 14er Quilt in front of Mount Princeton
Related Posts with Thumbnails