26 February 2021
Friday Fortius
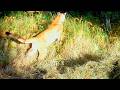
This video made me admire Lizard even more because his journey with Parkinson's is like that 100-mile desert marathon. He just keeps trying, keeps on going, putting one foot in front of the other, refusing to give up. No matter how hard the path gets.
25 February 2021
Charming Painterly Petals

March is just around the corner, quite literally, so it was time to get serious about finishing another quilt if I want to achieve my goal of one WIP finish each month this year.

Because the two Painterly Petals charm packs and the Royal Blue Cotton Supreme yardage that went into the front of the quilt were not my favorite fabrics, I decided one of the Moda Gradients II I'd bought in a five-yard bundle because I loved the other four would be the perfect "time out" panel backing for this quilt. When I pulled out Parfait to look at it, it actually looked, to me, as if it was made to go on the back of this quilt.

The yard of Parfait flowers wasn't quite big enough to fill the entire backing, so I sliced some five-inch strips from the Painterly Petals yardage I'd bought specifically for the backing and the Cotton Supreme Royal Blue remnants, then sewed the strips together on both sides to then slice into exactly enough HSTs to go all the way around the panel, with two leftover blocks, which I might try later to incorporate into a pillow to go with the quilt.

I did not measure the panel before I began making the HSTs. I thought if the panel was an inch or two too big in either direction, I could simply slice off enough to make the HSTs fit. I didn't have to slice. They fit so perfectly, I was stunned! That NEVER happens to me!!!
The back still wasn't big enough, so this time I measured, then cut six 2.5-inch strips from the remaining Cotton Supreme Royal Blue... because that's all I could get out of it! All that remained when I got done was one mostly 2-inch strip. I thought I could piece it into more 2.5-inch strips if I ran out. Fortunately, I did not.

After adding the 2.5-inch borders, I had roughly 35 inches of a 2.5-inch strip of the Royal Blue left. I thought I could craft that and the mostly 2-inch strip into two more blocks to later add to the future leftovers pillow.
I didn't have much steadiness of hand with the longarm for the first half of the quilt, but in my opinion, I got better as I went. I freehanded curves into the Royal Blue triangles with blue thread on top and white on the backing. I free-motion quilted the outer round of HSTs and the borders with my little domestic machine with blue thread on both the top and the bottom. All quilting was finished in one weekend day.


Before I even though about what I would use for the backing, I had thought I would use rainbow leftovers from my Hoffman Spectrum wall quilt binding. After I finished the back, I decided the rainbow of batik leftovers wouldn't look as good with the back of the quilt as they would with the front of the quilt. I had exactly enough of the Painterly Petals yardage left to cut six strips for binding. Once again, I didn't measure, but I didn't think it would be long enough. I pieced the binding, then made random cuts and spliced in some Royal Blue diamonds, then went to work on binding the quilt.
Upon completion, I had one Royal Blue diamond and one Royal Blue remnant left. The amount of extra binding I had to cut off was exactly the same size diamond!!! This quilt literally was a mathematical miracle for me because I'm not that good at math at all, and everything worked so smoothly! Plus, almost all the (mostly) ugly fabric is gone!!!

We snapped a few photos of the quilt in front of some gorgeous red rock we had not been able to visit since... so long ago I can't even remember. Suffice it to say, Lizard had not communed with sandstone in at least 15 months, and probably longer than that. So he was in heaven. Snowflakes began dotting us as we returned to the car, and we're supposed to have around eight inches of heavy, wet snow by this morning! That put me in absolute heaven. We SO need the moisture.


Linking up with Alycia Quilts and Confessions of a Fabric Addict.
24 February 2021


23 February 2021
What The World Needs Now
While updating our walking streak total in the sidebar to the right recently (which I guess is viewable only on a computer or only if you opt to view "web version" on a mobile device (scroll to the bottom of this post, beneath comments, and push the "view web version" link, then hold your mobile device sideways so the text isn't so small you can't see it)), the title of today's blog post, originally published 15 August 2017, caught my imagination. I read it and sort of giggled that I thought things were bad then. I decided what I wrote nearly four years ago is more applicable than ever now, so I'm publishing it again.

It has taken many years for my adopted kids to realize life in my family was not so bad after all and that I am worthy of their trust. It has taken many, many years of patience for all three of us to begin the journey toward healing.
Even though we each have very different lives and backgrounds, there is one thing in common we share, and it has enabled us to work toward unity again. That precious attribute is love. Without love, we never could have mended any of our fences. Without love, there would have been no reason to reconnect.
I love my kids, even though they still have the power to absolutely drive me nuts. Even though they still can hurt me more deeply than anything else, even the aches and pains of old age!
Before I adopted my kids, I had fasted and prayed for children who needed love, and that's exactly what God gave me. There are two morals to this story. Be very careful what you pray for, and never give up hope. Ever.
For the last couple of years, an old, old song from my childhood has been heavy on my mind because of the excruciating polarization of our country, our society and our world. Do you remember this one?
What the world needs now is love sweet love,
It's the only thing that there's just too little of,
What the world needs now is love sweet love,
No, not just for some but for everyone.
The world has changed so much since I was 5 years old. And yet, what the world needs now isn't any different than what we needed back then.
Several years ago, I made socks for all the women in my family and for all my closest female friends.

28 pairs in one year! (Plus two extras.) My sock project left me with literally a pound of sock yarn leftovers...

...too small to make anything of much worth.

The leftovers are many different brands. They've come from many different breeds of sheep from many different places in the world. Some are a little thicker than others, even though they are supposed to be the same size. Some have a different twist. Some of them contain different types of fiber, such as silk or nylon. Some even have lumps. Some of them will turn to felt if I put them in hot water and wring them recklessly. Some will shrink with that treatment. Most of the colors clash when I bundle them all together. And none of them have enough substance to become more than a little ball of fluff.
Yet just look what happens when you put them all together with something they can all bond with in common.

Suddenly, their differences make them strong and powerful. They have become something of great worth, and they can provide warmth, security and comfort. Each color can do so much more than it could do alone, but each color still has its own unique beauty and personality. Unified, their differences are even more beautiful.

To me, love is just like that black yarn. It could be white yarn. It could be red yarn. The color doesn't matter. Love pulls us all together, regardless of where we come from, what type of families we came from or are raising, regardless of our education or lack thereof, regardless of what language we speak, regardless of our political beliefs, regardless of whether we can hold a tune or hit a high note. Or crochet a vest...

While researching the topic of unity recently, I came upon a Ted Talk by an American who had served many years in the Peace Corps in Africa. His primary responsibility was to build a community in an impoverished area where there were many people but no unity. He said the word community means common unity, everyone working together for the same goals.
When he first arrived in Ghana, the parents, many of them single parents due to a high mortality rate thanks to unsanitary conditions in which the people lived, could not afford to send their children to school, and the children often were sick with sometimes fatal gastrointestinal disease. The first thing Jason Rosenfeld taught the people was to wash their hands before eating. Other volunteers taught the people how to make soap. Some of the people began selling or trading soap, which enabled them to send their children to school. The children were healthier because of better hygiene. The circle of life within the community grew stronger and stronger because of very simple and basic education.
Jason Rosenfeld says community or common unity is when a neighbor sees another struggling and offers a helping hand. Community is when a problem needs to be solved and everyone comes together to find a solution. Community is the glue that binds us to one another, giving us a common sense of purpose and belonging. Without these things, the community ceases to be. It's just a bunch of people living in the same place.
Just like a bunch of forgotten yarn balls taking up storage space in the same dark closet.

When you bring the yarn balls together with a common thread or yarn, the yarn balls become something beautiful.
We, as fellow citizens of the earth, need to come together, just like that big collection of diversified yarn. We need to heal and help heal. I wanted to plug in Aerosmith's "Come Together" to wind this up because that was the phrase pounding in my heart. But the song below does an even better job of getting this message across.
Let's not just dream of a better world. Let's MAKE a better world. Together.
It has taken many years for my adopted kids to realize life in my family was not so bad after all and that I am worthy of their trust. It has taken many, many years of patience for all three of us to begin the journey toward healing.
Even though we each have very different lives and backgrounds, there is one thing in common we share, and it has enabled us to work toward unity again. That precious attribute is love. Without love, we never could have mended any of our fences. Without love, there would have been no reason to reconnect.
I love my kids, even though they still have the power to absolutely drive me nuts. Even though they still can hurt me more deeply than anything else, even the aches and pains of old age!
Before I adopted my kids, I had fasted and prayed for children who needed love, and that's exactly what God gave me. There are two morals to this story. Be very careful what you pray for, and never give up hope. Ever.
For the last couple of years, an old, old song from my childhood has been heavy on my mind because of the excruciating polarization of our country, our society and our world. Do you remember this one?
What the world needs now is love sweet love,
It's the only thing that there's just too little of,
What the world needs now is love sweet love,
No, not just for some but for everyone.
The world has changed so much since I was 5 years old. And yet, what the world needs now isn't any different than what we needed back then.
Several years ago, I made socks for all the women in my family and for all my closest female friends.
28 pairs in one year! (Plus two extras.) My sock project left me with literally a pound of sock yarn leftovers...
...too small to make anything of much worth.
The leftovers are many different brands. They've come from many different breeds of sheep from many different places in the world. Some are a little thicker than others, even though they are supposed to be the same size. Some have a different twist. Some of them contain different types of fiber, such as silk or nylon. Some even have lumps. Some of them will turn to felt if I put them in hot water and wring them recklessly. Some will shrink with that treatment. Most of the colors clash when I bundle them all together. And none of them have enough substance to become more than a little ball of fluff.
Yet just look what happens when you put them all together with something they can all bond with in common.
Suddenly, their differences make them strong and powerful. They have become something of great worth, and they can provide warmth, security and comfort. Each color can do so much more than it could do alone, but each color still has its own unique beauty and personality. Unified, their differences are even more beautiful.
To me, love is just like that black yarn. It could be white yarn. It could be red yarn. The color doesn't matter. Love pulls us all together, regardless of where we come from, what type of families we came from or are raising, regardless of our education or lack thereof, regardless of what language we speak, regardless of our political beliefs, regardless of whether we can hold a tune or hit a high note. Or crochet a vest...
While researching the topic of unity recently, I came upon a Ted Talk by an American who had served many years in the Peace Corps in Africa. His primary responsibility was to build a community in an impoverished area where there were many people but no unity. He said the word community means common unity, everyone working together for the same goals.
When he first arrived in Ghana, the parents, many of them single parents due to a high mortality rate thanks to unsanitary conditions in which the people lived, could not afford to send their children to school, and the children often were sick with sometimes fatal gastrointestinal disease. The first thing Jason Rosenfeld taught the people was to wash their hands before eating. Other volunteers taught the people how to make soap. Some of the people began selling or trading soap, which enabled them to send their children to school. The children were healthier because of better hygiene. The circle of life within the community grew stronger and stronger because of very simple and basic education.
Jason Rosenfeld says community or common unity is when a neighbor sees another struggling and offers a helping hand. Community is when a problem needs to be solved and everyone comes together to find a solution. Community is the glue that binds us to one another, giving us a common sense of purpose and belonging. Without these things, the community ceases to be. It's just a bunch of people living in the same place.
Just like a bunch of forgotten yarn balls taking up storage space in the same dark closet.
When you bring the yarn balls together with a common thread or yarn, the yarn balls become something beautiful.
We, as fellow citizens of the earth, need to come together, just like that big collection of diversified yarn. We need to heal and help heal. I wanted to plug in Aerosmith's "Come Together" to wind this up because that was the phrase pounding in my heart. But the song below does an even better job of getting this message across.
Let's not just dream of a better world. Let's MAKE a better world. Together.
22 February 2021
Snowflake Monday

During our most recent (snowless) polar dip, I thought it might be cool (pun intended) to douse a crocheted snowflake with mist to crease icicles. I absolutely LOVE the result! Almost as good as real snow!
Today's snowflake is from the pile of snowflakes from approximately 2012 I either didn't like or for which I didn't have time to write patterns. I didn't even have a photo of this one, so I must not have liked it. However, I do now!
You may do whatever you'd like with snowflakes you make from this pattern, but you may not sell or republish the pattern. Thanks, and enjoy!

Finished Size: 6 inches from point to point
Materials: Size 10 crochet thread, size 7 crochet hook, empty pizza box, wax paper or plastic wrap, cellophane tape, water soluble school glue or desired stiffener, water, glitter, small container for glue/water mixture, paintbrush, stick pins that won't be used later for sewing, clear thread or fishing line
Encased Snowflake Instructions
Make magic ring.
Round 1: 12 sc in ring; sl st in starting sc. Pull magic circle tight.
Round 2: [1 sc in next sc, ch 8, sk next sc] 5 times; 1 sc in next sc, ch 3, 1 trtr in starting sc to form 6th petal of Round.
If you're not reading this pattern on Snowcatcher, you're not reading the designer's blog. Please go here to see the original.
Round 3: Ch 2 (counts as 1 dc), 3 dc over post of trtr directly below, [ch 10, 4 dc in next petal] 5 times; ch10, sl st in 2nd ch of starting ch 2.
Round 4: Ch 1 (counts as 1 sc), 1 sc in each of next 3 sc, [ch 6, 2 dc in next petal, ch3, 2 dc in same sp, turn, 1 sc in next dc, 1 hdc in next dc, 2 dc in next ch 3 sp, ch 3, 2 dc in same sp, 1 hdc in next dc, 1 sc in next dc, turn, 1 sc in next sc, 1 hdc in next hdc, 1 dc in each of next 2 dc, 2 tr in next ch 3 sp, ch 4, yo and draw up loop through 3rd ch from hook, yo and draw through 2 loops on hook, yo and draw up loop through same ch, yo and draw through 2 loops on hook, yo and draw through all 3 loops on hook (cluster st made), ch 7, 1 sc in 5th ch from hook, ch 6, sl st in sc, ch 5, sl st in sc, ch 5, cluster st in 3rd ch from hook, ch 1, 2 tr in same ch 3 sp as previous tr stitches, 1 dc in each of next 2 dc, 1 hdc in next hdc, 1 sc in next sc, sl st in same sc, ch 6, 1 sc in each of next 4 sc] 6 times, omitting last 4 sc of final repeat; sl st in starting ch; bind off. Weave in ends.
Finish: Tape wax paper or plastic wrap to top of empty pizza box. Pin snowflake to box on top of wax paper or plastic wrap.
If using glue, mix a few drops of water with a teaspoon of glue in small washable container. Paint snowflake with glue mixture or desired stiffener. Sprinkle lightly with glitter. Wash paintbrush and container thoroughly. Allow snowflake to dry at least 24 hours. Remove pins. Gently peel snowflake from wax paper or plastic wrap. Attach 10-inch clear thread to one spoke, weaving in end. Wrap fishing line around tree branch (or tape to ceiling or any overhead surface) and watch snowflake twirl freely whenever you walk by! Snowflake also may be taped to window or tied to doorknob or cabinet handle.


19 February 2021
18 February 2021
Under My Head

Someone left a sweet little snowflake pillow on my porch right before Christmas. I used the snowflake designs on that tiny little pillow as crochet inspiration, and I shared the patterns each week via my Snowflake Mondays. I thought it would be fun to celebrate our sixth annual Make a Snowflake Day by recreating the little pillow with my crocheted snowflake interpretations on a Spoonflower fabric panel. I ordered the fabric on January 11. It didn't arrive in time for our Snowflake Ball on February 6, but it still became a fabulous pillow!

Here are my crocheted snowflake interpretations from the little pillow.

I photographed the white flakes on a piece of blue batik, then worked a little Photoshop magic to create the Spoonflower fabric panel. I had four repeats printed on yard of fleece. I chose fleece because I thought that would make the pillow really soft. Oh, was I right! I had ordered Spoonflower fleece once before, but I think they've upgraded because this batch is every bit as wonderful as the fleece I might buy in a fabric store.

I picked one of my Colorado 14er designs for the pillow backing, hoping the colors might go okay with the pillow front. Oh, am I ever pleased with the actual fabric!


I looked up down stuffing, and the price was so far out of my range, I decided I could use up some otherwise unusable quilt scraps inside the pillow. I decided to use up some of my batting remnants to line the pillow to pad the leftovers and make the pillow not quite so stiff. However, I didn't have enough large batting leftovers to make two linings. I have four big pieces, but I didn't want to cut into them because they are the perfect size for baby quilts. Oh, and I just learned I need to have another baby quilt finished by the end of March...
Last year when quilt batting was nowhere to be found, I bought an entire bolt of my favorite brand because I found one. I didn't even really scrutinize the price. I thought the bolt might be enough to finish all my WIPs, so I justified the expense. I truly did expect to finish seven or eight more quilts than I actually did last year! Yesterday I looked up how much a full bolt of batting would cost now, and it's $90 more than what I paid, so I consider this expense even more of a bargain now. I actually consider myself very lucky!!!
I had not cut into the stash yet. I measured and cut off a strip big enough to make three pillow linings. I didn't know if my cheap little sewing machine could handle two layers of fleece and six layers of batting, but I was about to find out.

The machine seaming wasn't the easiest I've ever completed, but it wasn't the most difficult, either. The thread broke only twice. It took longer to stuff the pillow than it did to sew all the way around it, except for the eight inch opening for stuffing.
I dug out all my quilt clippings from the past six or so years. I separated out some of the batting scraps because I can use that to stuff amigurumi.

And this is what I had left for pillow stuffing! Each of the sandwich-sized bags contains the clippings from two or three quilts! The big freezer bags have leftovers from T-shirt quilts and handcloth baby bibs.

I thought I might have enough clippings to finish a second pillow, too. But alas, all that's leftover now that the pillow is stuffed are the big bags. Just like that, all the little bags are gone! I really cleared out a bunch of storage space!!!


After stuffing, the pillow opening was hand-stiched closed with an upholstery needle in about 25 minutes. Now I lean on my newest pillow while I watch a movie, or I can lift it as a great arm workout. I can't believe how heavy it is! I guess I should weigh it to give that statement some proof...
Okay, so the pillow officially weighs 7 pounds. Not as heavy as it felt, but it is still a heavy pillow!

Linking up with Alycia Quilts and Confessions of a Fabric Addict.
17 February 2021
16 February 2021
Feeding America

For many years, the company for which I work has offered a monthly charity jeans day. All employees vote for 12 charities to receive the donations, and once a month, we donate $5 for the privilege of wearing jeans to work.

Last year, and so far this year, we aren't in the office. We've been encouraged to donate to the charity of our choice each month independently. But it just wasn't the same.

Late last year, the company came up with a new charitable challenge to help food banks during their leanest time of year. All employees were encouraged to get outside a few times a week from Thanksgiving to Christmas and to share stories and pictures of healthy actitivies. The (nationwide) company would make a $25 charitable contribution to Feeding America on behalf of each of us who participated.
Lizard and I walked outside every day we could, when it wasn't too icy for him. Not only did we feel good about doing something good for us, but we knew what we were doing would help feed others in need. Plus, I could see the tiny progress Lizard was making on relearning to walk every time we went out.

We recently learned the company made a $5,700 contribution to Feeding America at Christmas. Things were pretty lean for us last year, so we weren't able to do as much charitable work or make as many charitable contributions as we typically do in better times. I'm so thankful to work for a company that gives us options that allow us to do things for others, even when it's difficult to do even for ourselves. I'm also very grateful to still have a job. I know there are many who do not have that luxury. I'm glad we were able to help out in a small way!

15 February 2021
Snowflake Monday

Our sixth annual Snowflake Day/Make a Snowflake Day was February 6, and we celebrated with our annual Snowflake Ball. We enjoyed our first virtual gathering! It was so fun to crochet with Sisters (and Brothers!) of the Snowflake! Each of us worked on a snowflake or other crochet or tatting project while we relished in the company of others who love snowflakes as much as each of us do!

We basked in shared memories of doilies, doilies on couch backs and armrests (often held in place by stick pins!), crochet towel toppers that buttoned around oven handles, hankies with crocheted edgings, and crochet edgings on pillow cases, sometimes featuring an embroidered Southern belle with a crocheted skirt.
Today's pattern was designed during our Snowflake Ball. Inspiration came from a poster by Don Komarechka right near my computer.


Several of us on the "call" or in the "room", me included, would love to learn to tat, and two of our participants are tatters! I don't know when it will happen, but we are planning future virtual gatherings to learn to tat! Perhaps I will one day have a tatted snowflake pattern here to share!
Somewhere, I have my grandmother's tatting shuttle. I also have one from my friend Shonna, plus one from an aunt who has Alzheimer's and can no longer tat. But all I could find in time for today's blog post is one I bought who knows when.

Also, I was so busy working from home and trying to help Lizard with PT (because we ran out of benefits in August) during November and December, I missed the six zeroes when my blog hit the eight million visitor mark. I noticed in October I was getting close, and I meant to pay more attention. Too many other things took precedence. It's the first time I've totally missed the turning of the nines! And boy, did I miss this one by a longshot!
So now I guess I’m waiting for 8,100,000. And perhaps I'll have to work out a five zero snowflake pattern…

You may do whatever you'd like with snowflakes you make from this pattern, but you may not sell or republish the pattern. Thanks, and enjoy!

Finished Size: 6 inches from point to point
Materials: Size 10 crochet thread, size 7 crochet hook, empty pizza box, wax paper or plastic wrap, cellophane tape, water soluble school glue or desired stiffener, water, glitter, small container for glue/water mixture, paintbrush, stick pins that won't be used later for sewing, clear thread or fishing line
SPECIAL STITCHES:
Popcorn Stitch (pc)
Work 5 dc in designated st, take loop off hook, insert hook through top loop of 1st dc and replace loop on hook, pull loop through top of 1st dc.
Make a Snowflake Instructions
Make magic ring.
Round 1: [Pc in ring, ch 3] 6 times; sl st in top of starting pc. Pull magic circle tight.
Round 2: Ch 5 (counts as 1 dc and ch 3), [1 dc in top of next pc, ch 15, sl st in 11th ch from hook, ch 3, sk next 3 ch, 1 sc in next ch, * 1 dc in top of same pc, ch 3] 6 times, ending * on final repeat; sl st in 2nd ch of starting ch 5.
If you're not reading this pattern on Snowcatcher, you're not reading the designer's blog. Please go here to see the original.
Round 3: Sl st around Round 2 starting ch 2 that counts as dc, ch 2 and work pc around same ch 2, [1 pc around next Round 2 dc, ch 2, sl st around same dc, ch 2, sl st into next spoke ch 3 sp, ch 2, 2 dc in same sp, ch 3, sl st in same sp, sl st into next ch 10 spoke point, ch 10, sl st in 5th ch from hook, ch 3, sl st in same spoke ch 10 point, ch 10, sl st in 5th ch from hook, ch 5, sl st in same spoke ch 10 point, ch 8, sl st in 5th ch from hook, ch 5, sl st in same spoke ch 10 point, sl st in next spoke ch 3 sp, ch 3, 2 dc in same sp, ch 2, sl st in same sp, ch 2, * sl st around next Round 2 dc, ch 2, work 1 pc around same dc] 6 times, ending * on final repeat; sl st around Round 2 starting ch 2; bind off. Weave in ends.
Finish: Tape wax paper or plastic wrap to top of empty pizza box. Pin snowflake to box on top of wax paper or plastic wrap.
If using glue, mix a few drops of water with a teaspoon of glue in small washable container. Paint snowflake with glue mixture or desired stiffener. Sprinkle lightly with glitter. Wash paintbrush and container thoroughly. Allow snowflake to dry at least 24 hours. Remove pins. Gently peel snowflake from wax paper or plastic wrap. Attach 10-inch clear thread to one spoke, weaving in end. Wrap fishing line around tree branch (or tape to ceiling or any overhead surface) and watch snowflake twirl freely whenever you walk by! Snowflake also may be taped to window or tied to doorknob or cabinet handle.

Subscribe to:
Posts
(
Atom
)