31 March 2024
30 March 2024
29 March 2024
28 March 2024
27 March 2024


26 March 2024
A New Birthday Challenge

I wish I'd been taking photos all along. But I didn't think of it until November.

I'm teaching the 6- and 7-year-olds every other Sunday, and they are such a perfect age! They absolutely love when I crochet little things to help them remember something I've taught.

As their birthdays approach, I ask them what their favorite thing is, and then I do my best to crochet their wish to embellish a simple homemade birthday card. I adhere my crochet to the card with a glue stick so the kids can easily remove it and have Mom help them string it for hanging or just to keep in their pockets.

Last year, I crocheted flowers, hearts, bats (yes, bats!), a flamingo, autumn leaves, butterflies and a rainbow before I began taking photos of the finished cards. Of course, I also found perfect ways to fit snowflakes into three lessons last year, so each student received tiny crocheted snowflakes three different Sundays. One set glowed in the dark, you know, to represent the light of Christ. :)


Now they're all getting accustomed to me crocheting gifts for them. Recently, one of the kiddos brought a miniature set of scriptures into class. They all went nuts over the little-hand-sized book. I told them I would see if I could find some so they can each have one. I looked everywhere, finding only very expensive used copies on eBay.

Last week, miniature scriptures would have fit perfectly into the lesson ("feast upon the word"). I decided to buy a pdf of candy bar wrappers from Etsy to cover some candy bars to help explain the difference between reading scriptures and feasting upon scriptures. (I plan to share New Testament and Old Testament candy bars, too, but I'm stretching the lesson out over three weeks so I can help them understand the religious reason we celebrate Easter.) I told the class about my unsuccessful search, then presented them with even smaller "scriptures" they really could feast upon. (And boy, did they!!!)

The candy bars were a real hit. The parents loved them, too. The highlight of my day, however, was when one little girl told me I could just crochet scriptures for them. Perhaps book covers... Ha ha ha!

25 March 2024
Snowflake Monday

Today's snowflake bears the name of another snowplow. A snowplow is something I wish we needed today... alas, we aren't expecting much accumulation from Winter Storm Ronnie. Any moisture is good, though.

A fun bit of trivia regarding today's snowflake. The prototype has a pretty significant booboo. Can you see it??? I didn't see it until I was pinning it. It was already saturated with glue. I could have fixed it if I had noticed it sooner. I was tempted to name the flake Blunder or Bungle, but these days, I want my snowflakes to have a degree of dignity. Even a flawed flake still has beauty, right?

You may do whatever you'd like with snowflakes you make from this pattern, but you may not sell or republish the pattern. Thanks, and enjoy!

Finished Size: 5.5 inches from point to point
Materials: Size 10 crochet thread, size 7 crochet hook, empty pizza box, wax paper or plastic wrap, cellophane tape, water soluble school glue or desired stiffener, water, glitter, small container for glue/water mixture, paintbrush, stick pins that won't be used later for sewing, clear thread or fishing line
Blizzo Snowflake Instructions
SPECIAL STITCHES: Popcorn Stitch (pc) Work 5 dc in designated st, take loop off hook, insert hook through top loop of 1st dc and replace loop on hook, pull loop through top of 1st dc. Make magic ring. NOTE: The end of the 1st Round includes what might seem like pretty wacky instructions; I'm attempting to prevent binding off and joining again as well as reduce the number of thread ends to be woven in at the end. If you can't make sense of what I'm trying to describe, just finish the final picot and ch 2 the same as the previous 11, then join atop any ch 2 tip to begin Round 2.
Round 1: Pc in ring, [[ch 5, 1 dc in 3rd ch from hook (dc picot made)] 2 times, ch 2, pc in ring] 5 times; ch 5, 1 dc in 3rd ch from hook, ch 1, yo 5 times, draw up loop through top of starting pc, yo and draw through 2 loops on hook 4 times (trtr made, with 3 loops remaining on hook, draw up loop through 3rd trtr segment, yo and draw up loop through 2nd trtr segment, [yo and draw through 2 loops on hook] to form 6th spoke of Round (as shown below). Don't pull magic circle too tight.
If you're not reading this pattern on Snowcatcher, you're not reading the designer's blog. Please go here to see the original.

faux trtr made

draw up loop through 3rd segment

yo and draw up loop through 2nd segment

yo and draw through 2 loops on hook 5 times

1 dc in bottom of each dc picot
Round 2: Ch 2 (counts as 1 dc), 2 dc in same spoke tip, [ch 5, 1 dc in base of next dc picot, sk next 4 ch, 1 dc in base of next dc picot (as shown above), ch 5, in next spoke tip work (3 dc, ch 5, 1 dc in 3rd ch from hook, ch 18, 1 dc in 3rd ch from hook, ch 2, 3 dc] 6 times, omitting last 3 dc of final repeat; sl st in 2nd ch of starting ch 2; bind off. Weave in ends.
Finish: I've been stiffening my flakes with undiluted, full-strength water soluble school glue for quite a while now, and I've been squishing the glue onto and throughout each flake with my fingers (yucky mess!!!) instead of gingerly painting the flakes with glue. Yes, it's a mess. But it's faster. And stiffer.
Tape wax paper or plastic wrap to top of empty pizza box. Pin snowflake to box on top of wax paper or plastic wrap.
If using glue, mix a few drops of water with a teaspoon of glue in small washable container. Paint snowflake with glue mixture or desired stiffener. Sprinkle lightly with glitter. Wash paintbrush and container thoroughly. Allow snowflake to dry at least 24 hours. Remove pins. Gently peel snowflake from wax paper or plastic wrap. Attach 10-inch clear thread to one spoke, weaving in end. Wrap fishing line around tree branch (or tape to ceiling or any overhead surface) and watch snowflake twirl freely whenever you walk by! Snowflake also may be taped to window or tied to doorknob or cabinet handle.

24 March 2024
22 March 2024
21 March 2024
Sheer Luck

I didn't plan it this way, but spring colors kicked in at the beginning of a new C2C (corner to corner) row. Kind of excited to see how it will look in a couple of weeks!
20 March 2024


19 March 2024
The Drawing Board

Store-bought hot (cayenne pepper) birdseed shapes can be pretty darned pricey, but they are doing a great job of keeping most mammals away from my birdfeeders. I thought I'd try making my own.

I looked up a few recipes, boiled some water, dissolved the gelatin, poured the mixture in my emptied yogurt container, then stirred in lots of cayenne pepper and a couple of cups of bird seed. I used a plastic knife to "drill" a hole down the center of the pressed seeds for both my first and second attempts so the final product might fit on the feeder my sister-in-law gifted me two years ago. Stir, chill, then cut off plastic yogurt container and hang.

My first attempt wasn't too successful in holding its shape, but the birds don't mind.

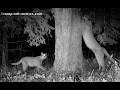
Neighborhood squirrels don't care much for the crumbled cayenne-pepper-soaked seed chunks I deliberately spilled on the retaining wall to test the tastebuds of my wildlife visitors. Each day, I watch squirrels taste and then abandon the spilled seeds. Three days after the shaped mess crumbled on me, most of the seed chunks still remained on the retaining wall, which means overnight raccoons aren't biting into it, either. One sleepless night, Lizard watched the deer briefly sniff and then walk away from the spilled seed and not even sniff the feeders. I guess they turned their peppered noses up at my free food!


I went back and re-read a bunch of blog posts about making your own birdseed ornaments and found one who had the same problem as me. Melting messes. I can't remember the name of the blogger now, but she recommended letting the cookie-cutter-shaped ornaments she was making as Christmas gifts for loved ones cure longer, perhaps a week or more. I can do that.

No, that's not spaghetti sauce! It's two tablespoons of cayenne pepper!
So I tried again. This time, I have a bit more self-confidence, and I added in a few nuts and raisins, as I'm still hoping to attract blue jays nesting right now in our area. I'm still going to have to keep a sharp eye out for bears, because I do not think for even one minute the cayenne pepper is going to be a deterrent to them at all. After first bear sighting, which could come any day now, I'll probably be done feeding the birds until November. Darn it. But if my second DIY seed shape works, perhaps I have a less-expensive great winter of birdwatching season on the horizon!

18 March 2024
Snowflake Monday

I was seriously hoping to get some snowflake inspiration from our 30-inch blanket last week. I'm SO sad we had 30 solid hours of snow, and all I could shoot was five minutes here and there when work slowed down, which also coincided with slightly warmer temps, causing the snowflakes to melt in flight. I even tried freezing my glass to help the flakes maintain shape while I tried to focus.

We don't often get this much snow in one storm anymore, and this was the biggest one we'd had since 2021, when we got 19 inches, also on Pi Day. That reminds me I wanted to make a pi or pie snowflake, but I will try to keep that inspiration on the back burner for now. I have to come up with something meaningful to commemorate Winter Storm Qadir.

I've been through all 123 of my photos (most not clear or clean enough to share or even bother editing). I really need to crochet a capped column because this storm brought the most I'd ever seen. Capped columns are very difficult (for me) to photograph because so much depth of field is lost in macro photography. That means the amount of focus between the foreground and background. But it's so exciting to see them, even when they melt too quickly. They are just so unusual, in my opinion. Until this storm...


It's going to take me a while to figure out how to make a column that can hold its shape, so I'm sticking with two-dimensional snowflakes for now. Rest assured the challenge is not going unanswered!!! I will create a capped column. But today's pattern is inspired by one of three snowflakes I captured. Can you see which one influenced today's crochet?


You may do whatever you'd like with snowflakes you make from this pattern, but you may not sell or republish the pattern. Thanks, and enjoy!

Finished Size: 7 inches from point to point
Materials: Size 10 crochet thread, size 7 crochet hook, empty pizza box, wax paper or plastic wrap, cellophane tape, water soluble school glue or desired stiffener, water, glitter, small container for glue/water mixture, paintbrush, stick pins that won't be used later for sewing, clear thread or fishing line
Winter Storm Qadir Snowflake Instructions
Make magic ring.
Round 1: Ch 2 (counts as 1 dc), 1 dc in ring, [ch 12, sl st in 5th ch from hook, ch 7, 2 dc in ring] 5 times; ch 12, sl st in 5th ch from hook, ch 5, 1 dc in 2nd ch of starting ch 2. Don't pull magic circle to tight.
Round 2: [Ch 2, sk next 2 dc and next 2 ch, sl st in next ch, 1 sc in each of next 4 ch, ch 8, sk over ch 4 picot, * 1 sc in each of next 4 ch, sl st in next sc] 6 times, ending * on final repeat; 1 sc in next ch, yo and draw up loop through each of next 3 ch, draw up loop through top of Round 1 final dc and 1st loop on hook (tunisian sc), [yo and draw through 2 loops on hook (tunisian sc)] 2 times.
Round 3: [Ch 3, sk over 2 sc on next spoke and sl st in 3rd sc, 1 sc in next sc, 1 sc in each of next 4 ch, ch 5, 1 sc in 5th ch from hook, ch 5, sl st in sc, ch 4, sl st in sc (tri picot made), 1 sc in each of next 4 sc, sl st in next sc] 6 times.
If you're not reading this pattern on Snowcatcher, you're not reading the designer's blog. Please go here to see the original.
Round 4: Ch 7 (counts as 1 dc and ch 5), [sk next 3 ch, 1 dc in next sc, ch 15, sk over tri picot and next 4 sc, 1 dc in next sc] 6 times, omitting last dc of final repeat; sl st in 2nd ch of starting ch 7.
Round 5: Ch 2 (counts as 1 dc) [1 dc in each of next 5 ch and in next dc, sk next 3 ch, in next ch work (1 dc, ch 3, 1 dc), sk next 3 ch, in next ch work (1 dc, ch 3, 1 dc, ch 5, 1 dc, ch 3, 1 dc), sk next 3 ch, in next ch work (1 dc, ch 3, 1 dc), sk next 3 ch, 1 dc in next dc] 6 times, omitting last dc of final repeat; sl st in 2nd ch of starting ch 2; bind off. Weave in ends.
Finish: I've been stiffening my flakes with undiluted, full-strength water soluble school glue for quite a while now, and I've been squishing the glue onto and throughout each flake with my fingers (yucky mess!!!) instead of gingerly painting the flakes with glue. Yes, it's a mess. But it's faster. And stiffer.
Tape wax paper or plastic wrap to top of empty pizza box. Pin snowflake to box on top of wax paper or plastic wrap.
If using glue, mix a few drops of water with a teaspoon of glue in small washable container. Paint snowflake with glue mixture or desired stiffener. Sprinkle lightly with glitter. Wash paintbrush and container thoroughly. Allow snowflake to dry at least 24 hours. Remove pins. Gently peel snowflake from wax paper or plastic wrap. Attach 10-inch clear thread to one spoke, weaving in end. Wrap fishing line around tree branch (or tape to ceiling or any overhead surface) and watch snowflake twirl freely whenever you walk by! Snowflake also may be taped to window or tied to doorknob or cabinet handle.

Subscribe to:
Comments
(
Atom
)